Overview
In this advanced blog, we explain how to create a new custom machine learning node in the punch. Our goal is to predict the number of travelers in each train station of Il-de-France, the France area that includes Paris and its suburbs. We will learn the historical traffic trends using a SARIMAX time series algorithm. SARIMAX means Seasonal Autoregressive Integrated Moving Average with exogenous factors. In a nutshell:
- ‘Auto-Regressive Integrated Moving Average’ (<em>ARIMA</em>) is a class of models that ‘explains’ a given time series based on its own past values, that is, its own lags and the lagged forecast errors, so that equation can be used to forecast future values.
- Seasonal adds periodicity to ARIMA, which basically says, for example in the case of load forecasting, that the load looks very similar every day at 6 PM.
- Adding eXogenous variables, which basically allows external variables to be considered in the model, such as weather forecasts.
The punch provides already the spark machine learning algorithms on the shelves, but SARIMAX is not one of them. Not an issue, we will build our own python node and add it to the Punch library.
The punch lets you very easily add python custom nodes, and design simple (so-called) punchlines that are actutally arbitrary processing pipelines. Refer to the punch getting started documentation, it provides a simple example.
In this blog we do something more sophisticated : we will first add a custom python node, then leverage it as part of Spark machine learning java nodes. You can indeed mix python and java nodes in the same punchlines. The punch-provided spark runtime takes care of executing these seamlessly.
Of course doing this is for advanced users, typically the punch core or data science teams from Thales Service. Regular user only design simple python nodes or even simpler only reuse existing nodes. This said, going through the complete exercice provides a great view of how the punch work and is used in Thales.
Prerequisites
You need a PunchPlatform standalone (at least version 5.6.1), python >= 3.3 and java jdk1.8.0
You need to install some python libraries:
<span style="font-family: georgia, palatino, serif;">pip install jep</span><span style="font-family: georgia, palatino, serif;">pip install statsmodels</span>
An easy way to have the right jdk installed is to use <a href=”https://www.jenv.be/”>jenv</a>. Here are the typical jenv install steps:
git clone https://github.com/jenv/jenv.git ~/.jenv
echo 'export PATH="$HOME/.jenv/bin:$PATH"' >> ~/.bashrc
echo 'eval "$(jenv init -)"' >> ~/.bashrc
source ~/.bashrc
export JAVA_INSTALL_DIR=~/opt/java
cd $JAVA_INSTALL_DIR
wget https://github.com/AdoptOpenJDK/openjdk8-binaries/releases/download/jdk8u222-b10/OpenJDK8U-jdk_x64_linux_hotspot_8u222b10.tar.gz
tar -zxvf OpenJDK8U-jdk_x64_linux_hotspot_8u222b10.tar.gz
jenv add jdk8u222-b10
jenv enable-plugin export
jenv global 1.8.0.222
source ~/.bashrc
For this use case you also need to download the jep jar file: https://jar-download.com/artifact-search/jep
Importing the data
We start importing our traffic data into Elasticsearch. Download the first semester and the second semester public CSV files. There are many ways to insert CSV files into elasticsearch, since we work on a punch we will do that using a simple punchline. A punchline is a data pipeline you configure by combining nodes: one node to read the CSV file, another to insert the data into elastic.
Start your standalone, go to the Kibana punch plugin and launch the Punchline Editor. There create a new spark punchline, and add a File Input and an Elastic Batch Output node. Using the editor link the two of them together. There you have your punchline.
You now need to configure each node:
- In the File Input node
- select the csv format
- set the delimiter and header options to ‘;’ and true.
- set the file_name property to ‘/path/semester1’
- In the Elastic Output node set the nodes property to ‘localhost’ and set your elasticsearch target index name
- Finally, add a global settings section with the two files.
"spark_settings": {
    "spark.files": "/path/file1.csv,/path/file2.csv"
}
Be careful! You must not add a white-space between the files!
Alternatively you can just write our cut and past this hadn-written example:
{
  runtime: spark
  dag: [
    {
      type: file_input
      component: file_input
      settings: {
        format: csv
        file_name: semestre1.csv,semestre2.csv
        options: {
          inferSchema: true
          delimiter: ;
          header: true
        }
      }
      publish: [
        {
          stream: data
        }
      ]
    }
    {
        type: show
        component: show
        settings: {
          truncate: false
        }
        subscribe: [
            {
                component: file_input
                stream: data
            }
        ]
    }
  ],
  settings: {
    spark.files: semestre1.csv,semestre2.csv
  }
}
Then, drag and drop an elastic batch output node with the following properties:
- choose localhost for nodes in Advanced panel
- write your index name in properties panel
You can also change all these parameters in the source panel.
After connecting the two nodes together you should have something like this:
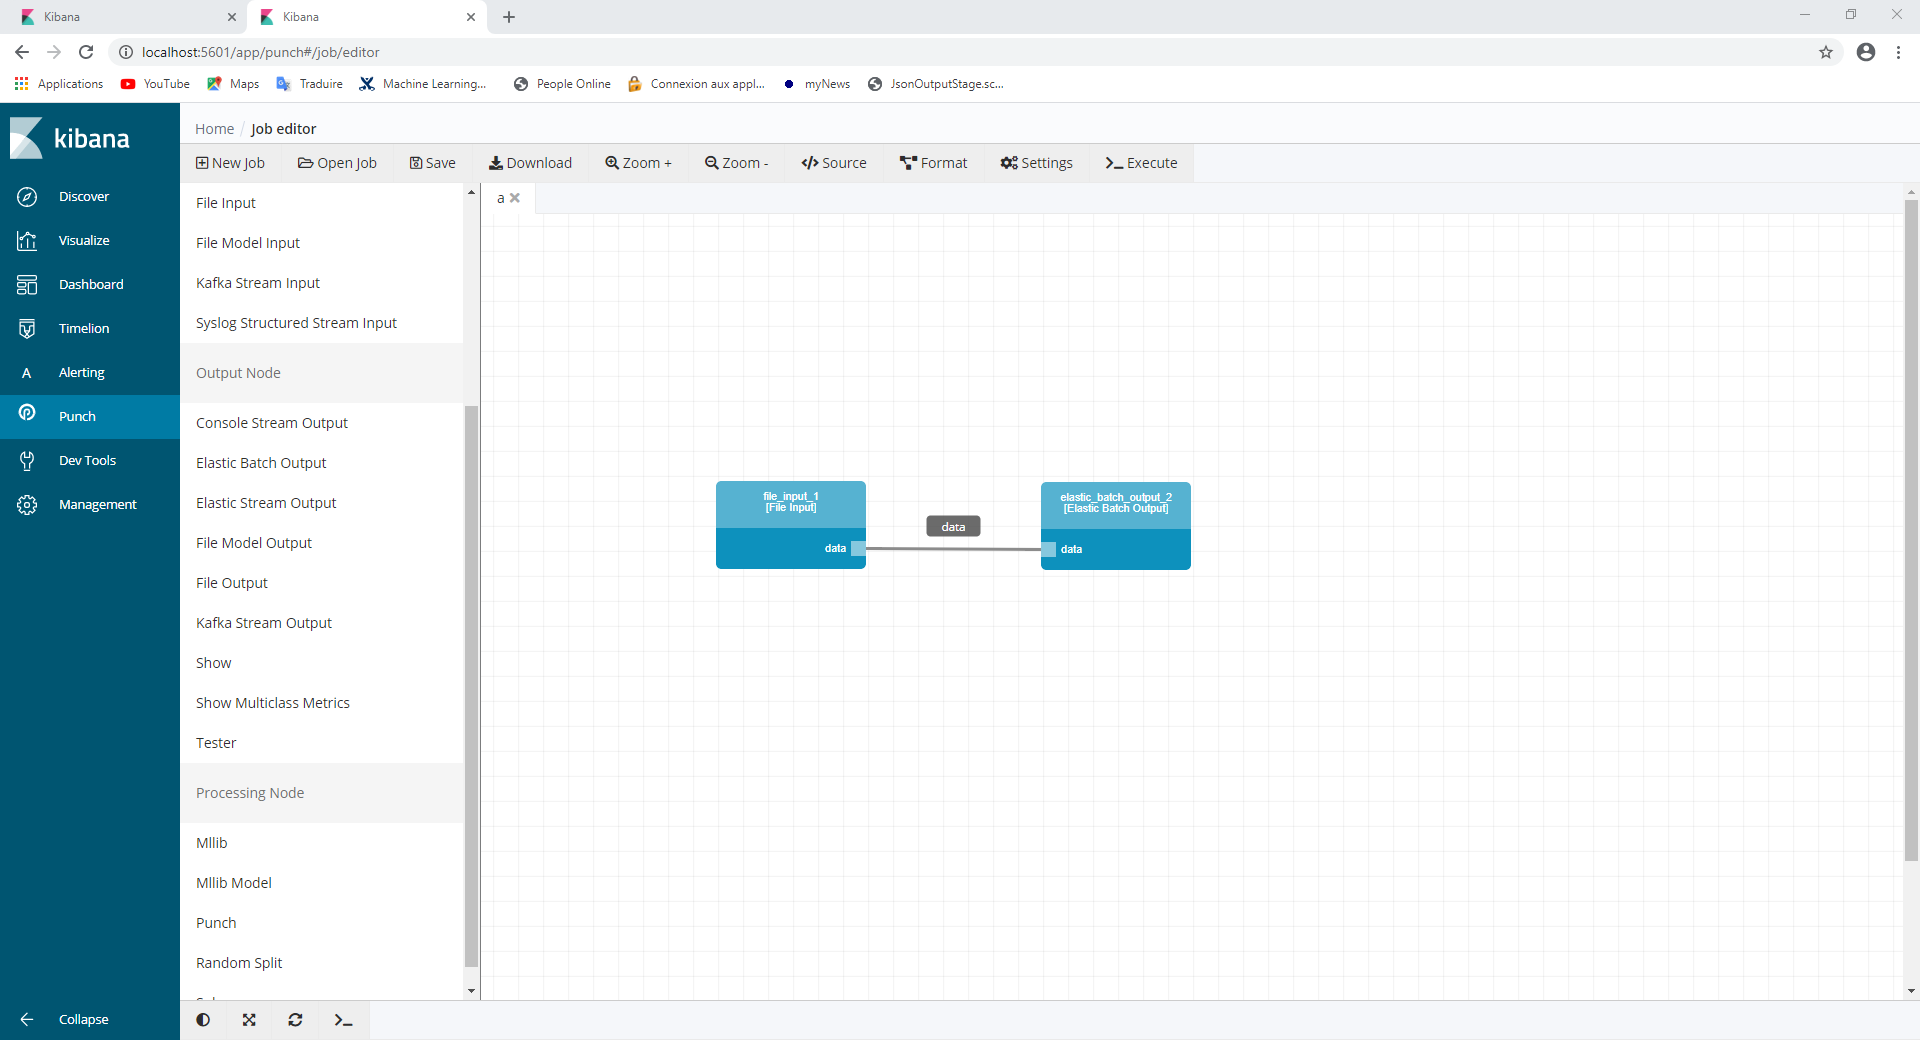
It’s now processing time ! Let’s click on the execute button on the top right handside (be patient, it may takes some time).
Once execution done, you can notice that we just add one of the two files. For the remaining one, we need to replace the file name by the name of the second file and re-execute the job. It will merge this file with the previous one within the same index.
Well done, our data is ready to be consumed and processed !
The python script
Our data is in Elastic, let us now focus on dding a SARIMAX processing node and make it available to the punch.
The first step is to create a python script including our fellow below :
import pandas as pd
import numpy as np
from statsmodels.tsa.statespace.sarimax import SARIMAX
def sarimax_fitpredict(train_dates, train_values, params=(8, 0, 0, 7, 1, 2, 7), predict_steps=1):
    dates = list(map(pd.to_datetime, train_dates))
    values = list(map(int, train_values))
    params = tuple(map(int, params))
    steps = int(predict_steps)
    idx = pd.date_range('2018-07-01', '2019-06-30')
    ts = pd.Series(data=values, index=dates).reindex(idx, fill_value=0.0)
    mod = SARIMAX(endog=ts,
    order=params[:3],
    seasonal_order=params[-4:],
    enforce_stationarity=False,
    enforce_invertibility=False)
    try:
        results = mod.fit(disp=0)
    except np.linalg.LinAlgError:
        mod.simple_differencing = True
        results = mod.fit(disp=0)
    forecast = results.get_forecast(steps=steps)
    former_key_dict = forecast.predicted_mean.clip(0).to_dict()
    res_dict = {}
    for former_key in former_key_dict.keys():
        key = str(former_key).split(' ')[0]
        res_dict[key] = former_key_dict[former_key]
This script will be called by java later on, so we need to put all the code inside a dedicated function. Every input of this function will be provided by the Punchplatform node parameters.
The custom node
Our own custom node is near the corner ! Let’s move on :
Prerequisites:
First, you need to implement the node interface. All the required punch dependencies can be installed in your local maven repository by executing the command line:
punchplatform-development.sh --install
To use python in java you need to add the <span style="font-family: georgia, palatino, serif;">jep</span> library in your maven file:
export JEP_PATH=your_jepjar_path
mvn install:install-file
   -Dfile=${JEP_PATH}/jep-3.9.0.jar
   -DgroupId=black.ninia
   -DartifactId=jep
   -Dversion=3.9.0
   -Dpackaging=jar
Analytics algorithm:
Before creating our node, you need to create a first java class which will call the Python script.
The class shall extends the spark transformer class and use the ScanNode notation to allow the class to be scanned by the punchplatform :
<span style="font-family: georgia, palatino, serif;">@ScanNode(type = ScanNode.ScanType.OUTPUT_NODE)</span>
In the Python script, some parameters are required to launch the algorithm so you have to configure the parameters fields in the node. Then, you can use these values inside your algorithm.
After cleaning the data, you can compute the forecast with the python script. In our problem, we have several train stations for which we want to predict the traffic so we have to distribute our agorithm. To do this, you can map the function using the jep library to each train station (each row of our dataframe) :
@ScanNode(type = ScanNode.ScanType.OUTPUT_NODE)
public class Sarimax extends Transformer {

    private static final long serialVersionUID = 1L;

    private final Param<Integer> p = new Param<>(this, "p", "p for Sarimax");
    private final Param<Integer> d = new Param<>(this, "d", "d for Sarimax");
    private final Param<Integer> q = new Param<>(this, "q", "q for Sarimax");
    private final Param<Integer> p_Seasonal = new Param<>(this, "p_Seasonal", "P for Sarimax");
    private final Param<Integer> d_Seasonal = new Param<>(this, "d_Seasonal", "D for Sarimax");
    private final Param<Integer> q_Seasonal = new Param<>(this, "q_Seasonal", "Q for Sarimax");
    private final Param<Integer> s = new Param<>(this, "s", "s for Sarimax");
    private final Param<Integer> n = new Param<>(this, "n", "number of day to predict");

    @Override
    public String uid() {
        return "showStage_" + serialVersionUID;
    }

    @Override
    public Transformer copy(ParamMap extra) {
        return defaultCopy(extra);
    }

    @Override
    public Dataset<Row> transform(Dataset<?> input) {
        final SparkSession spark = SparkSession.builder().getOrCreate();

        Dataset<Row> df = input.toDF();

        MapType map = new MapType(DataTypes.StringType, DataTypes.DoubleType, false);
        StructField[] structFields = new StructField[] {
            new StructField("ID", DataTypes.StringType, true, Metadata.empty()),
            new StructField("FORECAST", DataTypes.createArrayType(map), true, Metadata.empty())
        };

        return df.map(r -> {
            SharedInterpreter sub = new SharedInterpreter();
            sub.runScript(System.getenv().get("PUNCHPLATFORM_SPARK_INSTALL_DIR")+"/python/Sarimax.py");

            // p, d, q, P, D, Q, s
            ArrayList<Integer> params = new ArrayList<>();
            params.add(getP());
            params.add(getD());
            params.add(getQ());
            params.add(getP_Seasonal());
            params.add(getD_Seasonal());
            params.add(getQ_Seasonal());
            params.add(getS());
            sub.set("params", params);

            sub.set("train_dates", r.getList(1).stream().map(x -> ((GenericRowWithSchema) x).get(0)).collect(Collectors.toList()));
            sub.set("train_values", r.getList(1).stream().map(x -> ((GenericRowWithSchema) x).get(1)).collect(Collectors.toList()));
            sub.set("nb_days", getN());
            sub.eval("p = sarimax_fitpredict(train_dates, train_values, params, nb_days)");
            Map<String,Double> predict = (HashMap<String,Double>) sub.getValue("p");
            sub.close();
            List<Object> timeSerieList = new ArrayList<Object>();
            timeSerieList.add(r.get(0));
            Map.Entry<String,Double> entry = predict.entrySet().iterator().next();
            List<Object> timeSerie = new ArrayList<Object>();

            timeSerie.add(JavaConverters.mapAsScalaMapConverter(predict).asScala().toMap(
                Predef.<Tuple2<String, Double>>conforms()
              ));
            timeSerieList.add(timeSerie.toArray());
            return RowFactory.create(timeSerieList.toArray());
            }, RowEncoder.apply(new StructType(structFields))
        );
  }

  @Override
  public StructType transformSchema(StructType schema) {
    return schema;
  }

}
Be careful! This code contains neither the getter and setter methods nor the library, you need to add them to make your class correct.
You could find the entire java class in our git repository
Node creation :
Then you have to create a second java class for the node.
package org.thales.punch.pml.plugins.timeseries;

import java.util.ArrayList;
import java.util.Arrays;
import java.util.LinkedList;
import java.util.List;
import java.util.ListIterator;
import java.util.Optional;
import org.apache.spark.ml.Pipeline;
import org.apache.spark.ml.PipelineModel;
import org.apache.spark.ml.PipelineStage;
import org.apache.spark.sql.Dataset;
import org.apache.spark.sql.Encoder;
import org.apache.spark.sql.Row;
import org.apache.spark.sql.SparkSession;
import org.apache.spark.sql.catalyst.encoders.RowEncoder;
import org.thales.punch.api.PunchUncheckedException;
import org.thales.punch.pl.plugins.udf.api.UdfRegistrationFactory;
import org.thales.punch.pml.configuration.NodeName;
import org.thales.punch.pml.configuration.exceptions.PMLException;
import org.thales.punch.pml.configuration.scanner.ScanNode;
import org.thales.punch.pml.job.IDeclarer;
import org.thales.punch.pml.job.IInputDatasetHolder;
import org.thales.punch.pml.job.IOutputDatasetHolder;
import org.thales.punch.pml.job.INode;
import org.thales.punch.pml.plugins.mllib.exceptions.PMLMllStageException;
import org.thales.punch.pml.plugins.mllib.ParamsConfiguration;

import com.fasterxml.jackson.annotation.JsonCreator;
import com.fasterxml.jackson.annotation.JsonProperty;
import com.fasterxml.jackson.core.type.TypeReference;

import static org.apache.spark.sql.functions.*;

@NodeName("TimeSeries")
@ScanNode(type = ScanNode.ScanType.PROCESSING_NODE)
public class TimeSeriesNode extends UdfRegistrationFactory implements INode {

  private static final long serialVersionUID = 1L;

  @JsonProperty(value = "pipeline")
  public List<ParamsConfiguration> pipeline = new LinkedList<>();

  @JsonCreator
  public TimeSeriesNode() {
    super();
  }

  private Pipeline getPipeline() throws PMLMllStageException {
    List <PipelineStage> stages= new ArrayList<> ();
    for (ListIterator<ParamsConfiguration> stagesConfigIterator = pipeline.listIterator(); stagesConfigIterator.hasNext();) {
      ParamsConfiguration stageConfiguration = stagesConfigIterator.next();
      try {
        PipelineStage stage = (PipelineStage) stageConfiguration.getSingletonNodeInstance();
        stages.add(stage);
      } catch (PMLMllStageException e) {
        e.setStageIndex(stagesConfigIterator.previousIndex());
        throw e;
      } catch (Exception e) {
        throw new PMLMllStageException(e).setStageIndex(stagesConfigIterator.previousIndex());
      }
    }
    return new Pipeline().setStages(stages.toArray(new  PipelineStage[stages.size()]));
  }

  @Override
  public void execute(IInputDatasetHolder input, IOutputDatasetHolder output) throws PMLException, PunchUncheckedException {
    super.execute(input, output);
    try {
      Optional<Dataset<Row>> inputFitPredict = input.getSingletonDataframe();
      if (!inputFitPredict.isPresent()) {
        throw new PunchUncheckedException("timeSeries node subscribed to empty data streams: Check if you set alias in your subscribed streams correctly to input_train");
      }
      SparkSession sparkSession = inputFitPredict.get().sparkSession();
      Encoder<Row> encoder = RowEncoder.apply(inputFitPredict.get().schema());
      Dataset<Row> inputFit = sparkSession.emptyDataset(encoder);

      PipelineModel model = getPipeline().fit(inputFit);
      Dataset<Row> predict = model.transform(inputFitPredict.get());
      output.put(predict);

    } catch (Exception e) {
      throw new PunchUncheckedException("timeSeries node failed during ", e);
    }
  }

  @Override
  public void declare(IDeclarer declarer) {
    declarer.subscribeSingleton(new TypeReference<Dataset<Row>>() {});
    declarer.publishSingleton(new TypeReference<Dataset<Row>>() {});
  }

}
By the way, the goal of this class is to use the previous created code in the PunchPlatform job editor.
Creation of two additional nodes
Data in our index is currently looking like this:
| Station id | Times | Values |
| A00123 | 2018-07-01 | 700 |
| A00123 | 2018-07-02 | 600 |
| A00123 | 2018-07-03 | 750 |
In order to predict the next values, the algorithm expects to have a specific data format, similar to the following :
| Station id | TimeSeries |
| A00133 | ((2018-07-01, 700), (2018-07-02, 600), (2018-07-03, 750)) |
So, we will have to create a new node to transform the data in this specific format:
@NodeName("DsToTimeSeries")
@ScanNode(type = ScanNode.ScanType.PROCESSING_NODE)
public class ToTimeSeriesNode implements INode {

  private static final long serialVersionUID = 1L;

  @JsonProperty(value = "Time")
    public String param_time = "column name";

    @JsonProperty(value = "Value")
    public String param_value = "column name";

    @JsonProperty(value = "ID")
  public String param_id = "column name";

  @JsonCreator
  public ToTimeSeriesNode() {
    super();
  }

  @Override
  public void execute(IInputDatasetHolder input, IOutputDatasetHolder output) throws PMLException, PunchUncheckedException {
    try {
      Optional<Dataset<Row>> inputDSOptional = input.getSingletonDataframe();
      if (!inputDSOptional.isPresent()) {
        throw new PunchUncheckedException("timeSeries node subscribed to empty data streams");
      }
      Dataset<Row> outputDS = inputDSOptional.get().toDF().groupBy(param_id).agg(sort_array(collect_list(struct(col(param_time), col(param_value)))).alias("TimeSeries"));
      output.put(outputDS);
    } catch (Exception e) {
      throw new PunchUncheckedException("timeSeries node failed during ", e);
    }
  }

  @Override
  public void declare(IDeclarer declarer) {
        declarer.subscribeSingleton(new TypeReference<Dataset<Row>>() {});
        declarer.publishSingleton(new TypeReference<Dataset<Row>>() {});
  }

}
Careful, this code does not contain the libraries but they are identical to the previous code, so do not forget to copy them into the class.
Finally, we need a last node to transform the result from the prediction node into the csv-like previous format :
@NodeName("TimeSeriesToDS")
@ScanNode(type = ScanNode.ScanType.PROCESSING_NODE)
public class TimeSeriesToDSNode implements INode {

  private static final long serialVersionUID = 1L;

  @JsonProperty(value = "Time")
    public String param_time = "column name";

    @JsonProperty(value = "Value")
    public String param_value = "column name";

    @JsonProperty(value = "ID")
  public String param_id = "column name";

  @JsonCreator
  public TimeSeriesToDSNode() {
    super();
  }

  @Override
  public void execute(IInputDatasetHolder input, IOutputDatasetHolder output) throws PMLException, PunchUncheckedException {
    try {
      Optional<Dataset<Row>> inputDSOptional = input.getSingletonDataframe();
      if (!inputDSOptional.isPresent()) {
        throw new PunchUncheckedException("timeSeries node subscribed to empty data streams");
            }
            String[] names = {param_time,param_value};
            Dataset<Row> outputDS = inputDSOptional.get().toDF().select(col("ID").as(param_id), explode(col("FORECAST"))).select(col(param_id), explode(col("col")).as(names));
      output.put(outputDS);
    } catch (Exception e) {
      throw new PunchUncheckedException("timeSeries node failed during ", e);
    }
  }

  @Override
  public void declare(IDeclarer declarer) {
        declarer.subscribeSingleton(new TypeReference<Dataset<Row>>() {});
        declarer.publishSingleton(new TypeReference<Dataset<Row>>() {});
  }
}
Again, this code does not contain the libraries. Same advice as before : copy/paste from previous code.
Creation of the jar file
Final step is to compile your algorithm into a lightweight jar.
You have to create a pom file (cf git for more info) and run the following command using maven :
mvn install
Congratulations! You just created your own custom node and make it available within your PunchPlatform.
Deploy your jar
To use your new node with the PunchPlatform and visualize it within the job editor, we will have to copy your jar file and the jep jar (if you want to call a python script) in the following folder:
<span style="font-family: georgia, palatino, serif;">punchplatform-standalone-x.y.z/external/spark-2.4.3-bin-hadoop2.7/jars/</span>
And the python script in the following folder:
<span style="font-family: georgia, palatino, serif;">punchplatform-standalone-x.y.z/external/spark-2.4.3-bin-hadoop2.7/python/</span>
You can then open the pml job editor in Kibana. Thus, you can use your new job by refreshing the node list.
If you can not see your new node in the node list, you can force the PunchPlatform to scan your jar file with the following command:
punchplatform-analytics-scan.sh > tmp/punch/pml_definitions.jsonRefresh again. Tada !
Use your nodes
Let’s now use our new nodes within a dedicated data process, a Punchline.
To do so, the first node we are going to use is the Elastic Batch Input:
- Choose the index name
- Select localhost for the nodes
Then we need to add a SQL node to clean and format our data:
- Add a first statement in the statement list:
{ output_table_name: df_clean statement: SELECT ID_GROUPOFLINES, JOUR, replace(`NB_VALD`, 'Moins de 5', 0) AS NB_VALD_CLEAN FROM elastic_batch_input_0_data WHERE ID_GROUPOFLINES != '?' } - And add a second statement:
{ output_table_name: data_sum statement: SELECT ID_GROUPOFLINES, JOUR, SUM(`NB_VALD_CLEAN`) AS NB_SUM FROM df_clean GROUP BY ID_GROUPOFLINES, JOUR } - To make the predictions go faster, we can just select several station ids with another statement:
{
  output_table_name: data
  statement: SELECT * FROM data_sum WHERE ID_GROUPOFLINES='A00123'
}
For the first statement, we are using the data given by the
Elastic Batch Inputnode, the table name is :component name+_+stream name
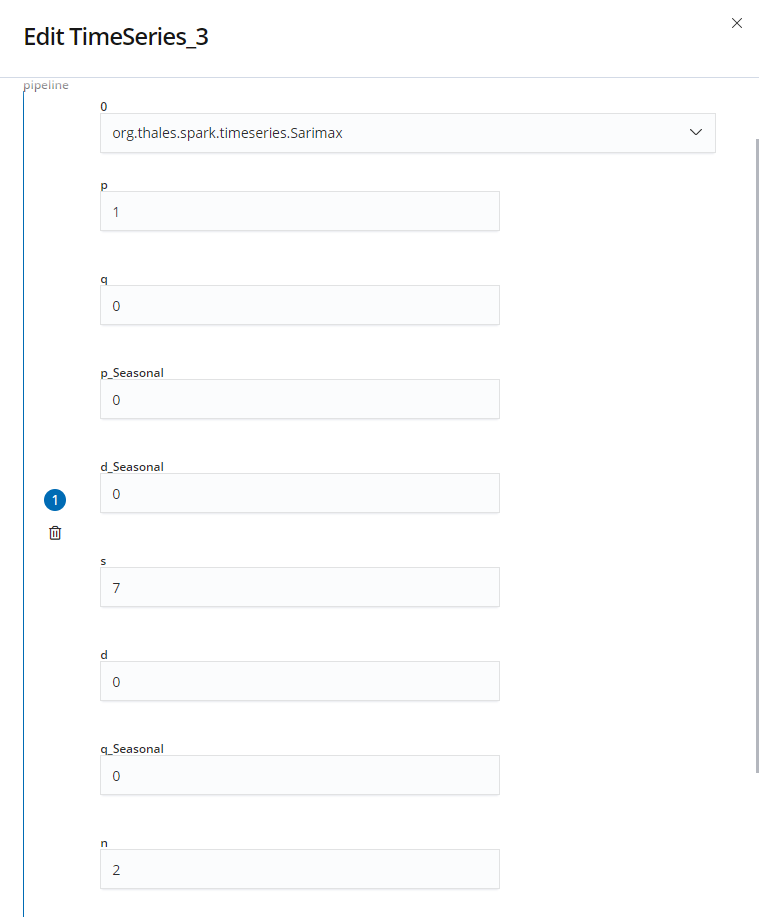
Now we can add the three custom nodes in the following order : Ds To Time Series, Time Series and Time Series To DS. For the two data converter nodes we have to select the names : Value, Time and ID. These fields refer to the column of our data. Then, we need to add the SARIMAX pipeline in the properties panel with the parameters we want :
Finally, we add a show node and click on the execute button to predict and eventually print the predictions in our console :
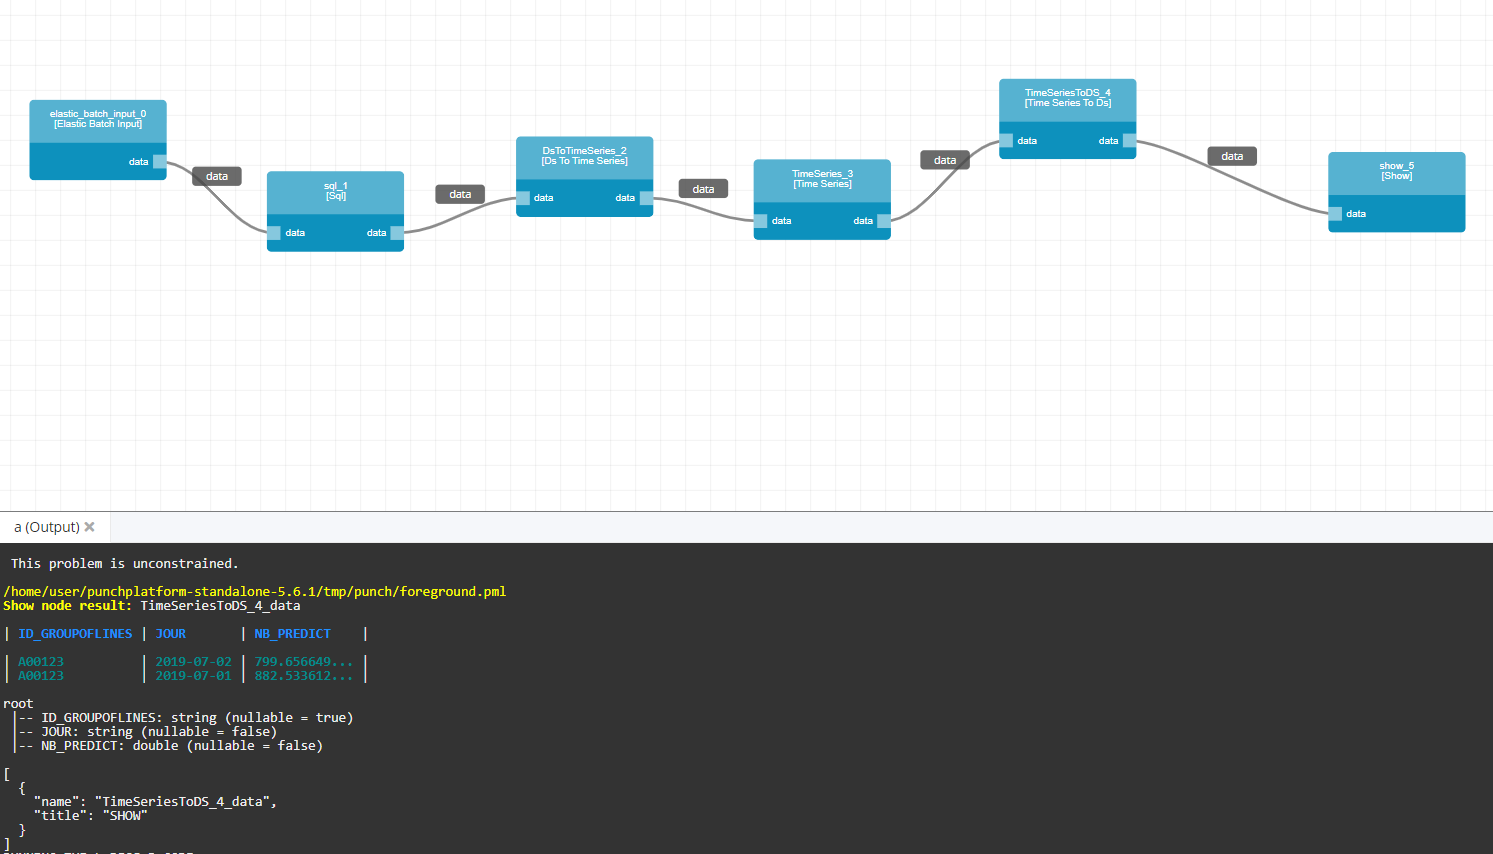
If you got “undefined”, you can use the following command in your terminal :
punchlinectl -p punchplatform-standalone-x.y.z/tmp/punch/foreground.pml
Additional tips : we can use an
Elastic Inputto save the result into an Elastic index for later use.
It is now up to you to create new custom nodes for your specific algorithms. You can found the entire code on our git. Do not hesitate to contribute and share your work to the PunchPlatform community. Stay tuned for other blogs !
Create a Jar file with all custom nodes